A construction inspection checklist is far more than a simple to-do list you check off. It’s a critical tool—your first line of defense against dangerous oversights, quality issues, and the kind of expensive rework that blows up budgets and timelines.
The Blueprint for an Effective Inspection
Let's get one thing straight: a generic, one-size-fits-all checklist is basically useless. The real power of an inspection checklist comes from tailoring it to the specific, unique demands of your project. It’s not about mindlessly ticking boxes; it’s about creating a systematic way to manage risk and enforce quality control from the moment you break ground.
A template you download off the internet can't possibly know your local building codes, the specific materials you're using, or the unique challenges of your job site. A truly effective checklist is built from the ground up, not just found.
Understanding the Different Inspection Demands
Any modern construction project involves multiple types of inspections, each with a very different focus. A quick daily walkthrough is all about spotting immediate safety hazards and tracking progress. In contrast, a milestone inspection for a plumbing rough-in is intensely technical and specific.
Around the world, construction site inspections are organized into key categories to ensure everything is up to snuff—compliance, quality, and safety. There are several distinct types you’ll see on most projects, from daily site walks to formal building regulation inspections by local authorities. You can get a deeper look into these different types from industry guides on SafetyCulture.com.
On any given project, you need a system to handle all these moving parts. Before you can build a useful checklist, you have to understand what you're inspecting and why.
Key Types of Construction Site Inspections
The table below breaks down the most common types of inspections you'll encounter. Each serves a distinct purpose and happens at different intervals throughout the project lifecycle.
Understanding these categories is the first step. It helps you organize your efforts and ensure nothing critical falls through the cracks.
Building a Foundation for Your Checklist
The bedrock of any good inspection checklist is its relevance. Before you even think about writing the first line item, you need to do your homework. This means getting your hands on the architectural plans, engineering specs, manufacturer installation manuals for major equipment, and, of course, all relevant local and national building codes.
For general contractors juggling a thousand things at once, a virtual assistant for small businesses general contractor can be a huge help here, handling the administrative legwork of gathering these documents and keeping inspection schedules organized.
Think of your checklist not as a chore, but as a strategic asset. A well-built checklist becomes the operational blueprint that guides your team to a safe, on-time, and high-quality project.
Building Your Custom Checklist From The Ground Up
Let’s be honest: a generic checklist you find online isn’t going to work for your project. It has no idea about your local soil conditions, the specific HVAC unit you’re installing, or the unique municipal codes you’re up against. For a checklist to be truly effective, it needs to be built from scratch, tailored to the reality of your job site.
Think of it like gathering your ingredients before you start cooking. You can't just grab a random recipe; you need to know what you're making. The first step is to pull together all the critical documents that define quality and compliance for your specific build.
Your essential document list should absolutely include:
- Architectural and Engineering Plans: This is your bible—the primary source for what you're building.
- Local Building Ordinances: These are the non-negotiable rules of the road set by your city or county.
- Manufacturer Specifications: Don't forget the fine print for installing key materials like windows, roofing, and especially complex MEP systems.
- Client Requirements and Contracts: These documents outline any special quality standards or materials the client has specifically requested and paid for.
Once you have this pile of documents, you're ready to start breaking the project down into manageable chunks.
Segmenting Your Project Into Logical Phases
Trying to inspect an entire building with one giant checklist is a surefire way to miss things. It’s overwhelming and inefficient. The best way I've seen this done in the field is to segment the build into its logical phases and create a dedicated checklist for each one. This keeps your team focused and the inspections relevant.
For a typical residential project, for instance, you might break it down like this:
- Excavation and Site Prep
- Foundation and Concrete
- Framing and Structural Sheathing
- MEP (Mechanical, Electrical, Plumbing) Rough-In
- Insulation and Drywall
- Finishes and Punch List
This phased approach means your crew can concentrate on what’s important right now. The items on your foundation checklist are totally different from what’s on the finishes list, and that’s exactly how it should be.
Crafting Clear and Actionable Inspection Points
Now that you have your phases, it’s time to write the actual checklist items. This is where the rubber meets the road. Vague language is your enemy; it leads to inconsistent inspections and subjective judgment calls. Every single item needs to be a direct question or statement that requires a simple "yes," "no," or "N/A" answer.
This flow chart gives a great overview of how an inspection process should be prepared from the start.
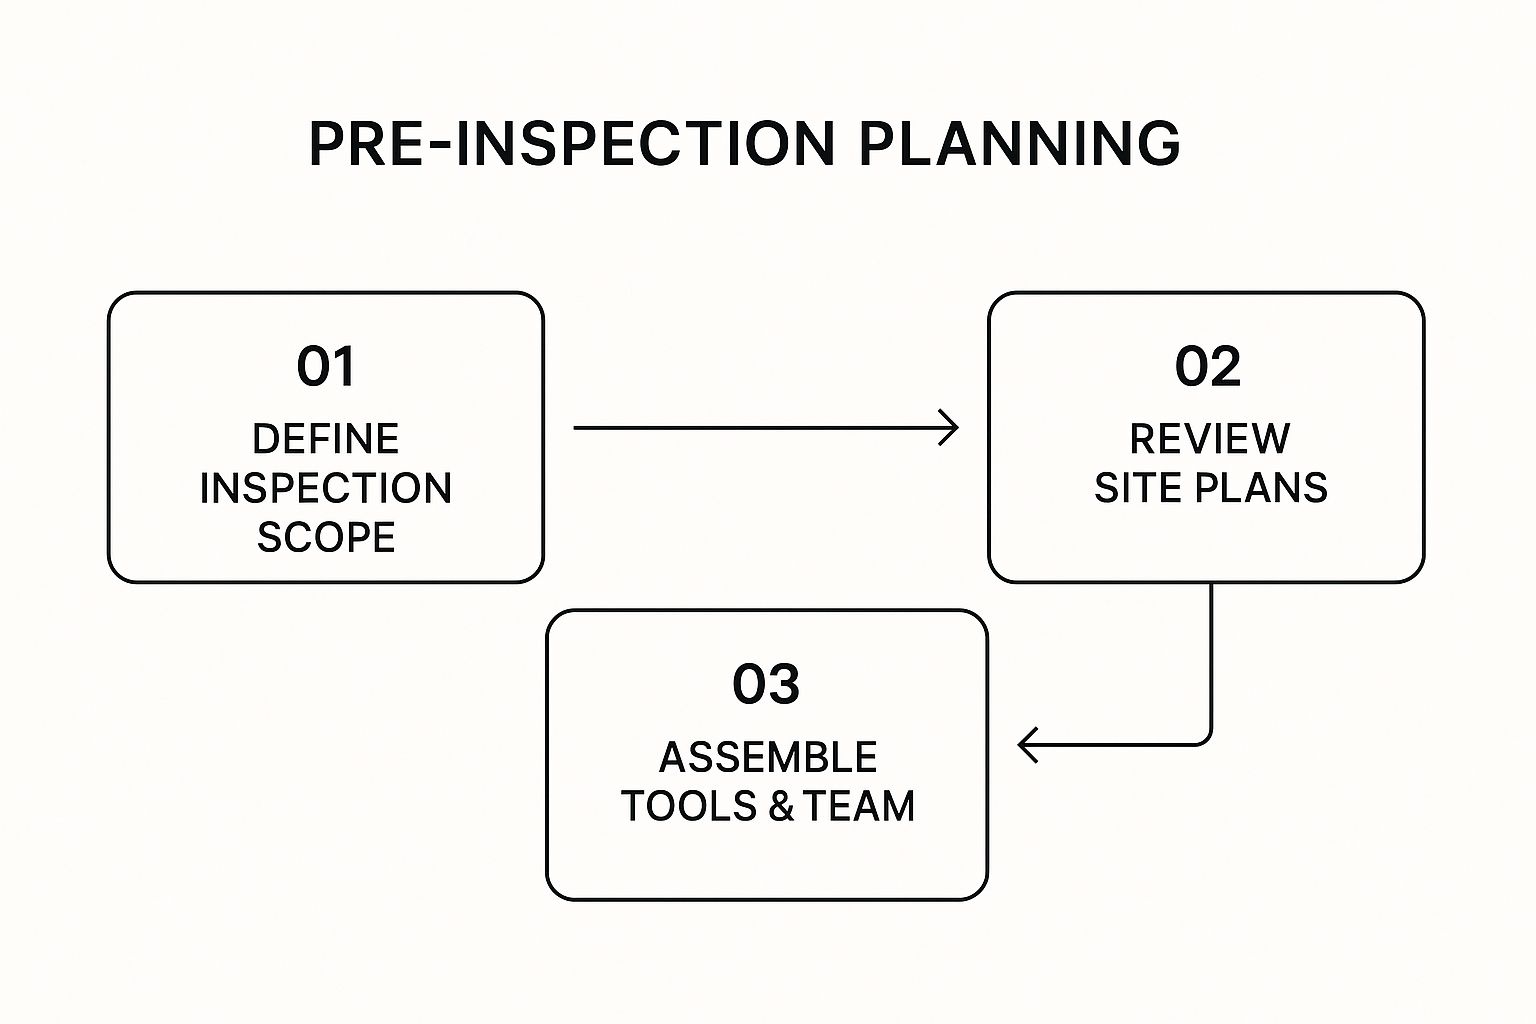
As you can see, a successful inspection begins long before anyone sets foot on-site. It starts with a clear scope and a detailed review of the plans.
Let's look at some real-world examples. I've seen both good and bad checklist items over the years, and the difference is stark.
Vague and Ineffective:
- Check rebar.
- Framing looks okay.
- Verify window installation.
Clear and Actionable:
- Is rebar spaced at 16 inches on-center per structural plan S-2?
- Are all load-bearing wall studs doubled up at openings?
- Is the window flashing installed behind the building wrap at the head, as per manufacturer specs?
The whole point is to eliminate ambiguity. A well-written checklist item ensures that an inspection done by your most seasoned superintendent gets the exact same result as one performed by a greener foreman. That consistency is the mark of a truly professional quality control system.
Weaving Safety Into Every Inspection Point
A great construction inspection checklist does more than just tick boxes for quality. It actively prevents accidents. I've seen firsthand that treating jobsite safety as some separate, isolated task just doesn't work. You have to bake it into every single inspection point, turning your checklist into a powerful, day-to-day risk management tool that genuinely protects your crew.

The best checklists I've worked with are proactive. They tackle the high-risk activities that safety organizations are always warning us about. Think about it this way: a vague line item like "Check Safety" is useless. Instead, integrate specific safety checks directly into the relevant tasks. For example, when you're inspecting framing, a checkpoint should explicitly confirm that temporary guardrails are secure on every open upper floor. It’s that specific.
Focusing on High-Risk Activities
Certain hazards on a jobsite are responsible for a huge number of incidents, so your checklist has to hit these hard with clear, non-negotiable checkpoints. Construction inspection checklists are absolutely essential for making sure safety standards are met on modern projects.
In fact, some of the most common safety inspections across the U.S. include checklists for Jobsite Hazard Identification, PPE Inspection, Fall Protection, and Scaffolding Safety. The Fall Protection Checklist, for instance, directly confronts one of OSHA’s “Big Four” construction hazards, which together account for nearly 35% of all U.S. construction fatalities. If you want to dig deeper, research from Safesite detailing the top safety inspections is a great resource.
When you build these specific items into your process, you create a system that almost forces compliance and reinforces good, safe habits.
Beyond the Obvious Dangers
Of course, you have to cover the big dangers like falls and electrical risks. But a truly comprehensive approach to safety looks at the entire jobsite environment. An effective construction inspection checklist considers the total well-being of your workforce, not just the immediate physical threats.
From my experience, it's the seemingly small things that often get missed. Consider adding checkpoints for these areas:
- Site Hygiene: Are the portable toilets actually clean and stocked? Is there a designated area with clean drinking water and handwashing stations?
- Emergency Plans: Is the emergency action plan—with site maps and contact numbers—posted somewhere everyone can see it without having to search for it?
- Heat Stress Prevention: During the hot months, is there a shaded rest area? Are foremen actively reminding crews to hydrate?
- Material Storage: Are heavy materials stacked properly to prevent a collapse? Are walkways and, most importantly, emergency exits kept completely clear?
A great checklist doesn't just ask if the work is done right; it asks if the work is being done safely. It transforms the inspection from a reactive quality check into a proactive safety audit, creating a culture where crew well-being is a measurable part of every task.
This integrated approach means safety is no longer an afterthought. For instance, your trenching checklist shouldn't just confirm the dimensions. It must also verify that spoil piles are set back from the edge, that a competent person has inspected the trench walls, and that access ladders are correctly placed. Every single checkpoint reinforces a critical safety protocol, making your inspection process one of your most powerful tools for stopping incidents before they ever happen.
Putting Your Checklist Into Action on Site
A perfect construction inspection checklist is worthless if it just collects dust in the site trailer. Now it's time to shift from design to deployment, focusing on how to make your checklist a living, breathing part of the daily workflow on site. Ultimately, success hinges on one thing: getting your team to actually use it consistently and correctly.
This starts with choosing the right format. Sure, paper checklists are simple and familiar, but we’ve all seen them get lost, damaged by weather, or require tedious manual data entry back at the office. Digital tools on a tablet or phone are now the standard for a reason. They give you instant photo documentation, much easier tracking of open issues, and real-time reports that boost efficiency in ways paper just can't match.
Fostering Team Buy-In and Ownership
Let's be honest, the biggest hurdle isn't the technology; it's getting people to use it. Simply handing your crew a new checklist and telling them "do this" is a recipe for failure. Real buy-in comes from explaining the "why" behind each inspection point.
During a quick toolbox talk, don't just read off the list. Connect the dots for them. Explain how verifying rebar spacing prevents a failed engineering inspection that could stall the project for a week. Show them how double-checking fall protection anchor points is directly tied to their own safety. When the team understands that the checklist protects them from rework and risk, it stops being another piece of administrative nonsense and starts being a tool for their benefit.
A checklist forced upon a team will always be pencil-whipped. A checklist built and explained with the team becomes a shared standard of excellence that everyone feels accountable for.
This sense of ownership is what really drives a culture of quality on a job site.
Documenting and Tracking Issues Effectively
The true value of an inspection is measured by the action it creates. Finding an issue is only half the battle. Documenting it clearly and tracking it to resolution is what actually matters. This process needs to be simple and airtight.
Your documentation for any failed item should include a few key elements:
- Clear Photographic Evidence: A picture is undeniable proof. Make it a rule that any "Fail" item must have photos showing the exact problem.
- Detailed, Objective Notes: "Pipe installed wrong" is useless. A good note reads, "PVC drain line has negative slope in the north bathroom; requires re-leveling." Specificity is key.
- Assignment of Responsibility: Clearly note which trade or individual is responsible for the corrective action. No ambiguity.
- A Simple Tracking System: Whether you're using dedicated software like Procore or a shared spreadsheet, maintain a live list of all open items. This "punch list" should be reviewed daily or weekly until every single issue is marked as "Resolved" and verified.
Throughout this process, maintaining objectivity is crucial. The goal isn't to place blame; it's to fix problems and move forward. When inspections are framed as a collaborative effort to hit project goals, you create a culture of accountability where team members are more likely to report issues themselves, knowing the focus is on the solution, not the mistake.
Common Checklist Mistakes And How To Fix Them
Even the most meticulously crafted construction inspection checklist can fall flat if you don't tackle some common pitfalls head-on. I've been on countless job sites, and the single most dangerous habit I see is “pencil-whipping.” This is where a foreman or inspector just checks boxes and signs off without doing a real, physical review of the work. It’s complacency, and it completely defeats the purpose of having a checklist in the first place.

Honestly, the only way to combat this is to build a site culture where it's just not acceptable. This falls on the superintendents. They need to be out there, actively spot-checking inspections and holding their teams accountable. If the culture treats inspections as a pointless formality, that's exactly what they'll become.
Keeping Your Checklists Relevant
Another mistake I see all the time is crews using outdated checklists. A construction project is a living, breathing thing; it’s constantly changing. The checklist you used for pouring the foundation is totally wrong for the MEP rough-in. It's absolutely crucial to have separate, specific checklists for each major phase of the project.
This goes for change orders, too. Any time a change order comes through, it should immediately trigger a review of the relevant checklists. For example, if the client suddenly decides on different window specifications, you've got to update the window installation checklist before that work ever starts.
The integrity of your entire inspection process depends on your checklist reflecting the current reality of the job site. A static checklist on a dynamic project is a recipe for error.
Given the dangers inherent in our industry, this kind of diligence isn't just a good idea—it's non-negotiable.
Addressing Systemic Challenges
Let's be real: the construction industry is one of the most hazardous in the world. We deal with high workforce turnover, a constant churn of subcontractors, and site conditions that can change in an instant. These issues make managing safety a huge challenge. Globally, an estimated 60,000 fatal accidents happen on construction sites every single year, which makes a systematic inspection process absolutely vital. You can read more about construction safety challenges in a detailed report from the International Labour Organization.
These factors are precisely why a solid inspection system is so important. A great checklist can be easily sabotaged by simple communication breakdowns. Here’s where I see it go wrong:
- Poor Communication of Findings: Just marking an item as "Failed" is useless. What went wrong? Who needs to fix it? The findings have to be communicated clearly, ideally with photos and specific notes, directly to the person or team responsible.
- No Follow-Up Process: Finding a problem is just the beginning. You need a system to track that issue, ensure it gets corrected, and then verify the fix with a re-inspection. Without that loop, things just fall through the cracks.
- Ignoring High Turnover: When new workers or an entirely new subcontracting crew shows up on-site, you can't assume they know your process. They must be briefed on your inspection standards and procedures from day one.
By getting ahead of these common mistakes—from pencil-whipping to poor follow-up—you can protect the integrity of your construction inspection checklist. It will become what it’s supposed to be: a powerful tool for ensuring both quality and safety on your projects.
Have More Questions? Let's Cover Some Common Ones
Even with the best templates in hand, putting them into practice on a busy job site always brings up new questions. It's completely normal. Over the years, I've heard just about everything, but a few questions seem to pop up on every project.
Let's walk through some of the most common ones I get from site supers, project managers, and even the crew leads themselves.
How Often Should We Really Be Doing Site Inspections?
Honestly, there's no magic number. The right answer depends entirely on where you are in the project and how complex things are.
For your day-to-day operations, a quick daily walk-through is non-negotiable. This is for catching immediate hazards, checking on general site conditions, and just getting a feel for the day's progress. Then, you'll want dedicated weekly safety inspections, which are more in-depth and often focus on high-risk areas like active scaffolding, crane operations, or new electrical work.
Beyond that, you need to think in terms of milestones. Certain checkpoints are critical and demand their own specific inspection. For instance, you absolutely must conduct a pre-pour inspection before the concrete trucks arrive. Same goes for pre-cover inspections for your mechanical, electrical, and plumbing (MEP) rough-ins. Get these wrong, and you're talking about tearing open walls or slabs—a costly, painful mistake.
Your local building codes will also dictate mandatory inspections at specific phases, so make sure those are baked into your schedule from day one.
What’s the Real Difference Between a Quality and a Safety Checklist?
This is a great question because they can definitely overlap, but their core purpose is fundamentally different.
A quality control (QC) checklist is all about the what. It's there to make sure the final product—the building itself—is built exactly to the plans and specifications. It asks questions like:
- Are these the correct Grade 5 bolts specified in the structural drawings?
- Is this wall perfectly plumb and within the 1/8-inch tolerance?
- Does this paint finish match the approved submittal?
A safety checklist, on the other hand, is all about the how. It focuses on the process and the people, aiming to spot and fix hazards before anyone gets hurt. It’s concerned with things like proper PPE, safe excavation practices, and guardrail integrity.
I always explain it like this: Your quality checklist confirms the wall was built straight. Your safety checklist makes sure the scaffold used to build it didn't kill anyone in the process. Both are critical, but they have different jobs.
Should I Stick with Paper or Go Digital with My Checklists?
While paper has a certain old-school simplicity—no dead batteries, right?—digital is where the industry is, and for very good reasons.
Using a checklist on a phone or tablet is just more efficient. You can embed photos directly into your report to show exactly what the issue is, eliminating any confusion. Reports can be automatically generated and emailed to the project team before you even get back to the trailer. That real-time information flow is a massive advantage.
Paper gets lost. It gets coffee spilled on it. It gets rained on. Then, someone has to decipher messy handwriting and manually type everything into a spreadsheet to track trends. For any modern, professional operation, switching to a digital platform isn't just a nice-to-have; it's a smarter way to work.
How Do I Get My Crew to Actually Use These Checklists?
This is the million-dollar question. You can have the world's best checklist, but if it stays in the truck, it's useless. Getting your team on board comes down to two simple things: involvement and understanding.
First, don't just create the checklist in an office and hand it down like a mandate. Pull your foremen and experienced crew members into the process. Ask them what makes sense and what doesn't. When they have a hand in creating the tool, they feel a sense of ownership. It becomes their checklist, not just more paperwork from the boss.
Second, when you roll it out, explain the "why" behind each item. Don't just read a list. Show them how checking for proper fall protection isn't just about avoiding a fine—it's about making sure their partner goes home at the end of the day. When they see the checklist as a tool that genuinely helps them, protects them, and prevents frustrating rework, you'll get the buy-in you're looking for.
Stop chasing down paper notes and wrestling with messy handwriting. With Nora, ResQ's AI assistant, your field crew can send job updates through WhatsApp using voice, text, or photo. Nora automatically organizes everything into clean, searchable logs for your office team. See how Nora can transform your field-to-office communication.